Approach2- Mirroring CSR and Gitlab Repository to Create Cloud Build Triggers and automate the CICD…
Approach2- Mirroring CSR and Gitlab Repository to Create Cloud Build Triggers and automate the CICD pipelines with GKE.
Hello everyone 👋, In this blog, we will be the creating CI/CD Pipelines with Cloud Build Triggers for Gitlab as a source repository.
We will be discussing on how to build the Gitlab repository by setting up mirroring between Google Source Repository and Gitlab repository.
As we have discussed in approach 1, that by creating webhook, we can trigger the ClouBuild for Gitlab as our Source Repository , but it lacks some features that we often use for our development and production environments.
Need of Mirroring CSR with Gitlab Repository
Cloud Build Triggers doesn't directly support Gitlab as a source repository. Also to overcome the limitations of webhook approach and features like $SHORT_SHA, $COMMIT_SHA, $TAG_NAME , etc and other substitution variables with our builds , we have mirrored the Gitlab repositories to use with GSR.
Now all the actions performed will be directly happening with CSR as a source . All our branches, tags, commits will be copied from Gitlab repository to Google Cloud Source Repository.
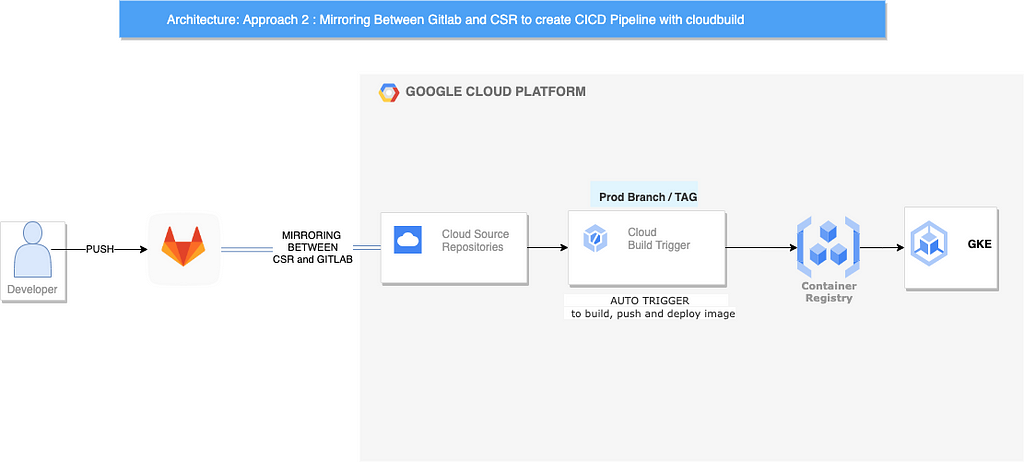
Architectural Flow (Approach 2)
- Whenever a developer will push his/her code into Gitlab repository, the repository will first mirrored to Google Source Repository.
- After th at Cloud build Trigger will trigger the build based on the events like push to branch/tag and take source as Google Source Repository.
- The steps inside the cloudbuild.yaml will be executed to build the cached image , tag it and push to a gcr/artifact registry and in final step the pushed image will be deployed to our GKE Cluster.
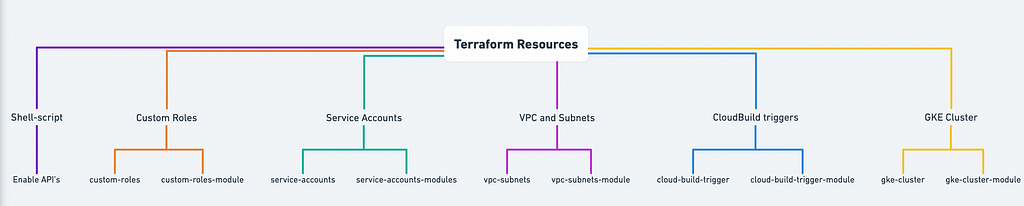
Prerequisite:
- Enable the following API from the below Shell Script.
- Provision the infrastructure such as VPC, Subnets, Service Accounts,Google Kubernetes Engine from the below repository.
Clone the below repository:
git clone https://github.com/sanketbisne/gcp-terraform-resources.git
cd gcp-terraform-resources
git checkout main
GitHub - sanketbisne/gcp-terraform-resources
Run the below shell script which will enable all the APIs needed to perform the below tasks.
./enable-api.sh
Step 1: Creating the repositories in Gitlab and Google cloud Source Repository.
Create a repo in Gitlab and CSR.
Go the the shell / console and execute below commands
gcloud init
gcloud source repos create REPOSITORY_NAME
Step 2: Authentication between Google Source Repository and Gitlab
Go the the Cloud Source Repository.

- Go on Manually generated credentials
- Click on 1."Generate and store your Git credentials"
- This will pop up a window to authenticate with your gcp account
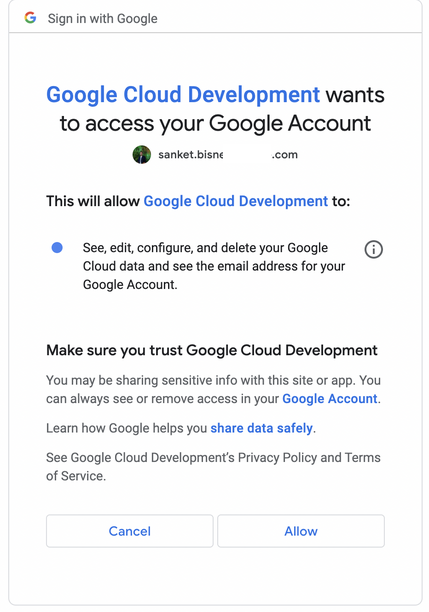
Click on Allow, we will be redirected to configure Git.
Choose your way of authentication , we can choose cloud shell or our local terminal to store your username and password .
Why we need to store username and password?
To tell Gitlab repository that , this is the repository where you have to copy the whole contents we need some authentication mechanism.
We need username and password . Our username and password will be tied to our Google Acco unt user, If incase by any chance the user access is been revoked from cloud identity or Google Cloud Project. Mirroring between google source repository and Gitlab repository stops. Because service accounts are not supported here.
We have to create a user in our cloud identity whose access will be forever in the organisation and grant it (SOURCE REPOSITORY ADMIN/WRITER) on project level.
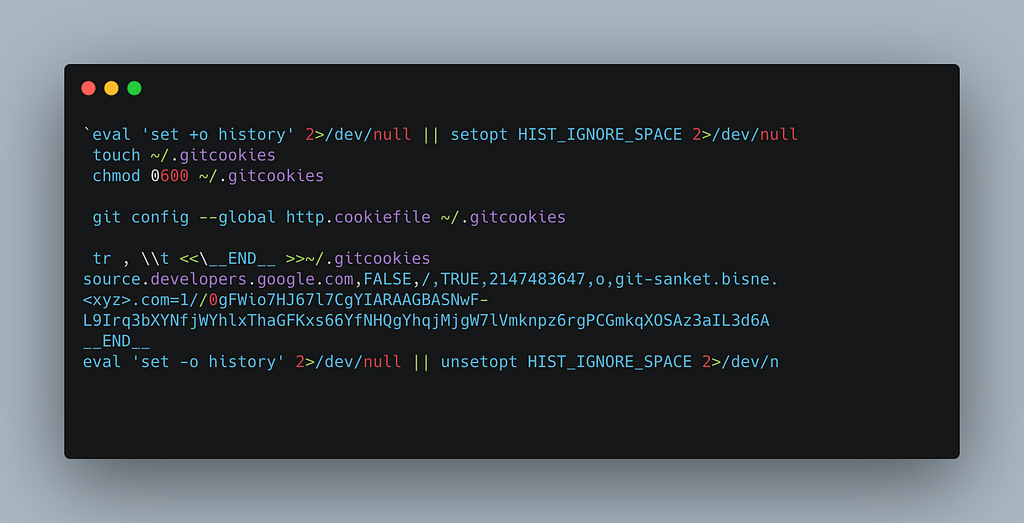
- Configure Git from below block of code . this will auto populate the username and password in .gitcookies file created in the home directory.
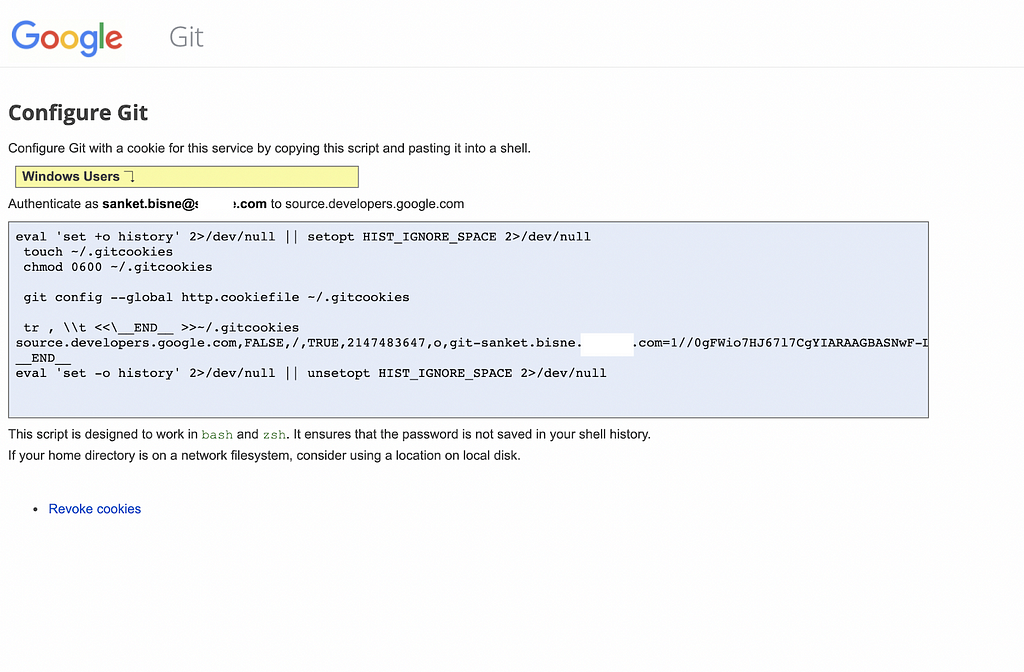
Step 3: Creating our Credentials.
Copy code from above block into your terminal. Below image is just for reference example.
Now, we need to open our cloud shell / local terminal< /p>
mkdir Credentials && cd Credentials
- Our credentials like username and password will be stored in the .gitcookie file located in the home directory.
cat .gitcookies
- Here we can see in the last column that we have 2 fields here, first one is the user id and another one is our password.
We will extract both username and password and enter this in our Gitlab repository section.

Extract the password from below commands.
grep 'source.developers.google.com' ~/.gitcookies | tail -1 | cut -d= -f2

Store the Username in environment Variable
CSR_USER=$(grep 'source.developers.google.com' ~/.gitcookies | \
tail -1 | cut -d$'\t' -f7 | cut -d= -f1)
Store the Source Repository value in CSR_REPO
CSR_REPO=$(gcloud source repos describe gitlab-csr-mirror --format="value(url)")
Fetch the username from the below command.
echo $CSR_REPO | sed "s/:\/\//:\/\/${CSR_USER}@/"
Copy the above generated username and password, enter into the Gitlab mirroring repository section
Below is the reference example how your username and password will look like.
username : https://git-<your-username>@source.developers.google.com/p/<project_id>/r/<your-google-cloud-source-repository-name>
Password: 1//0<random_id>
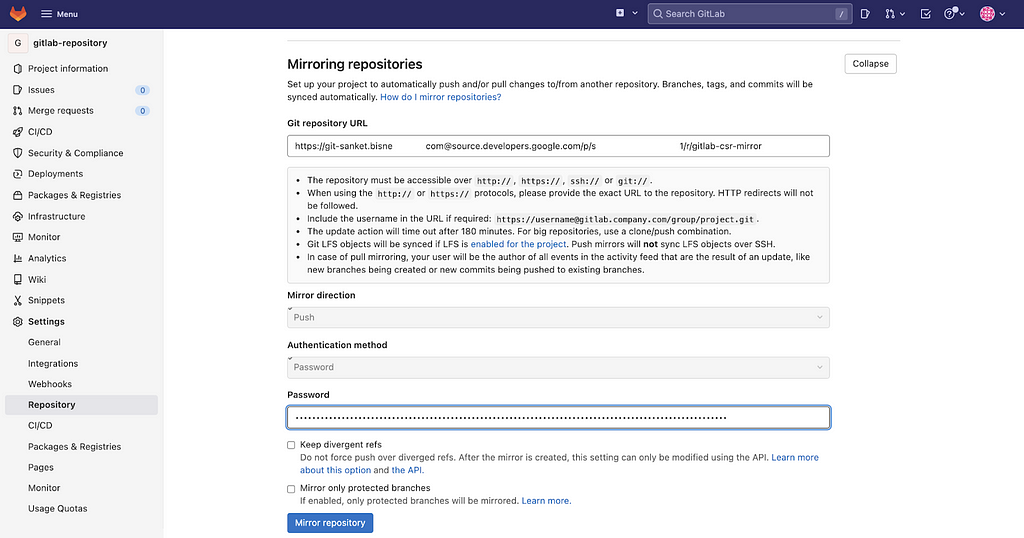
Step4: Adding the above generated Credentials to Gitlab Repository.
Go the Gitlab >> Repository >> Mirroring Repository
Enter the username and password, keep other options by default.
and click on Mirror Repository.
We can now see the status of mirroring , if it is sync with Google Source Repository.
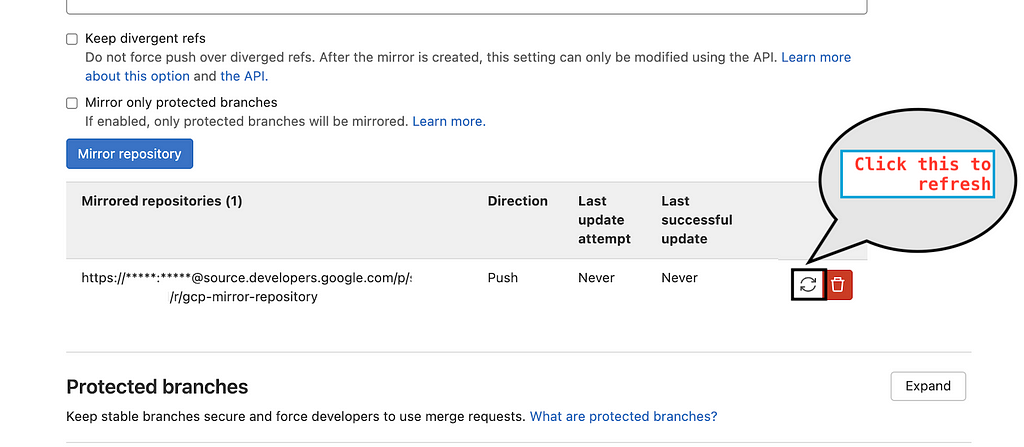
Gitlab sync with GCS every 7 minutes, it keeps track on every branch, commits, and changes occurring .We can force sync the changes by clicking on Sync now button.
Verify that the branches , Git Tags, Data , Folders, commits are copied from Gitlab to Google Source repository.
Push some changes it to Gitlab and it will automatically copies all data to CSR.
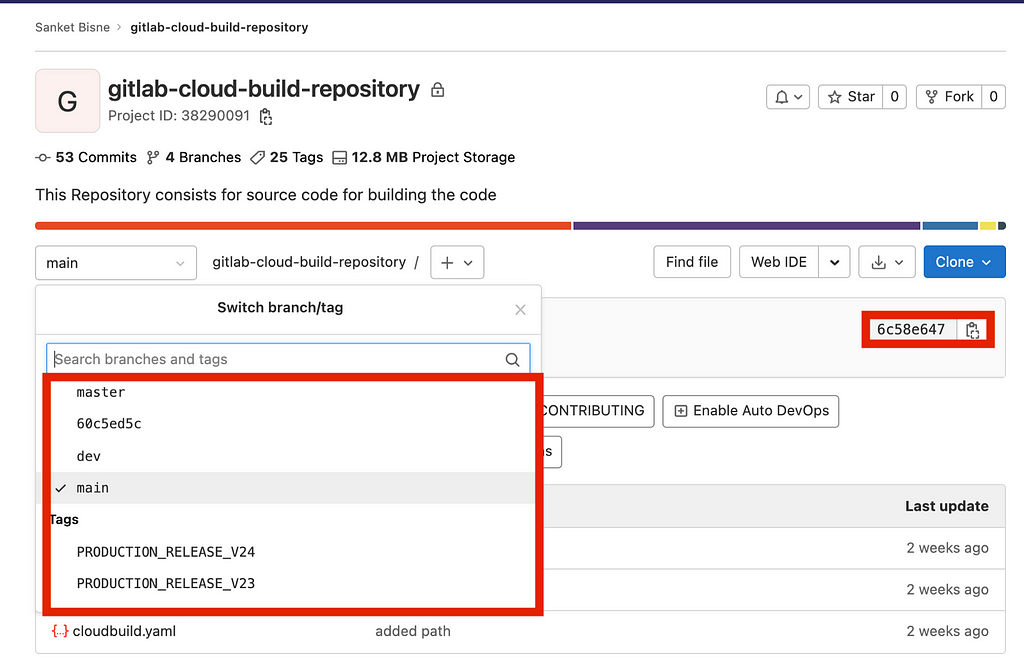
We can match the latest short commit sha on the right hand side ie 6c58e647
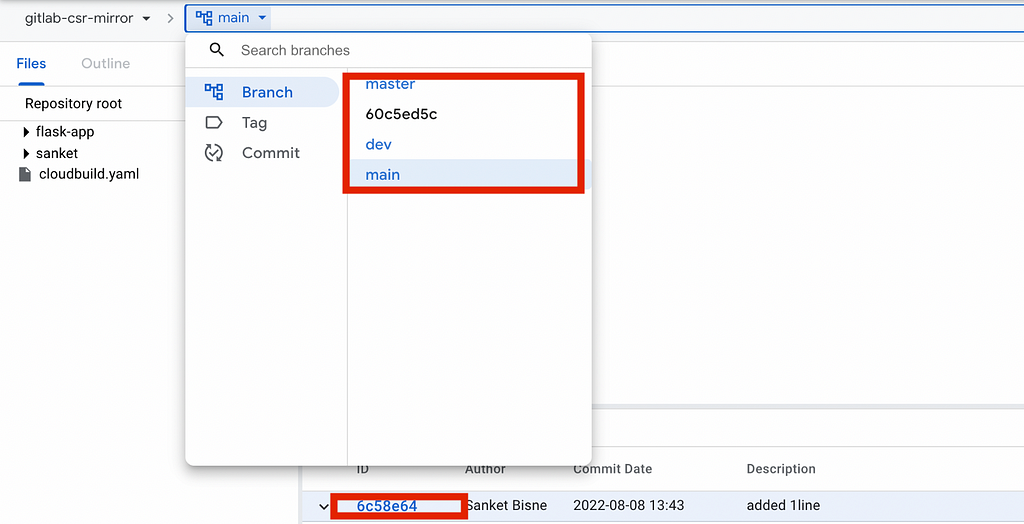
As we can see both data , commits , branches and tags are copied from Gitlab to Google Source Repositories.
Now we have ou r code copied to CSR ,let's start by configure our Cloud Build triggers.
Setting up the Cloud Build triggers and automating deployments with Cloud Build
Step 1: Preparing the cloudbuild.yaml file
Cloudbuild.yaml has 3 steps
- Building our code and tagging it with latest+short_sha+git_tag
- Pushing our code into Google container registry/ Artifacts registry.
- Deploying the image into our kubernetes cluster in a particular namespace.
For Best practice , all the variables are substituted and can be reused with a new repository.
Step 2: Creating a Service Account for Cloud Build and granting the required permissions to it.
Roles granted to Service Account:
- Kubernetes Engine Developer — Provides access to Kubernetes API objects inside clusters.
- Logs Writer — Provides the permissions to write log entries.

- Source Repository Reader — Provides permissions to list, clone, fetch, and browse repositories
- Storage Admin — Gives access to push images into GCR and Grants full control of objects and buckets.
Creating triggers for development environment.
- Click on Triggers-> Create a New Trigger.
Select Event — Push to a Branch
We will use push to a branch event to deploy our workloads for development/staging deployments. and push new tag event for our production deployments
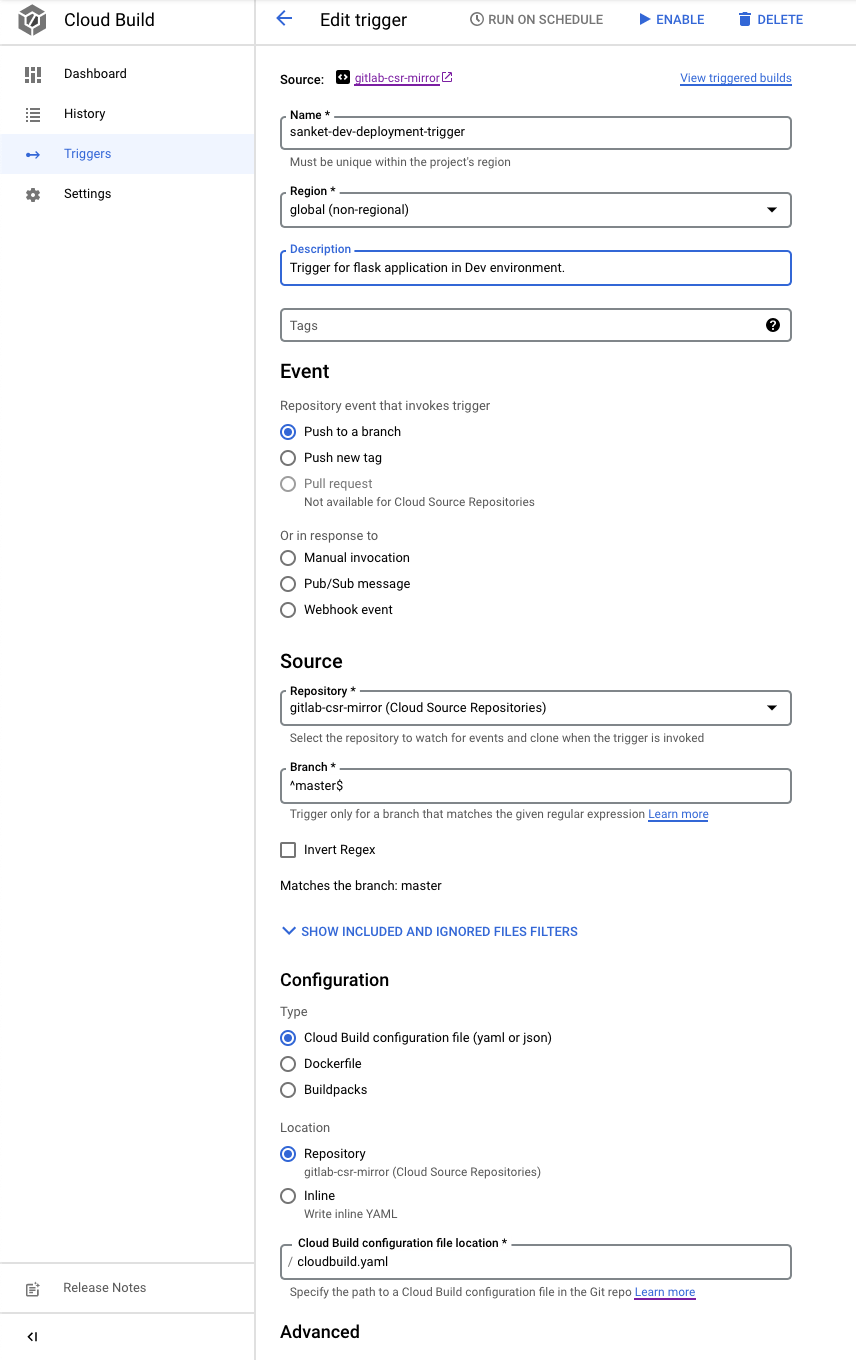
- Select the repository and branch where the Dockerfile resides and place the cloudbuild.yaml inside the specified directory.

- Select the cloudbuild.yaml file and service account
- Enable and Disable the Trigger as per requirement
Enable the trigger -> if we want to Trigger the cloudbuild steps specified in cloudbuild.yaml file whenever there is code change, we can set the trigger to be enabled.
Disable the Trigger -> If we don't want to trigger our cloudbuild whenever there is code change , we can set the trigger to be disabled.
Click on Trigger and push some changes into repository
NOTE: Whenever we push some changes into our Gitlab Repos itory, It takes 7 minutes to get Sync which Google Cloud Repository.
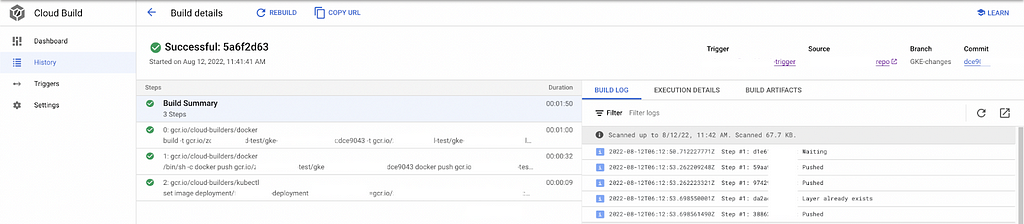
As soon as the Cloud Build gets triggered we can view the time executed to build the steps in the history section.
- Click on Build id and we can see the steps executed during Runtime.

We can see the build summary for our executed builds , and the duration of the builds to execute the steps .
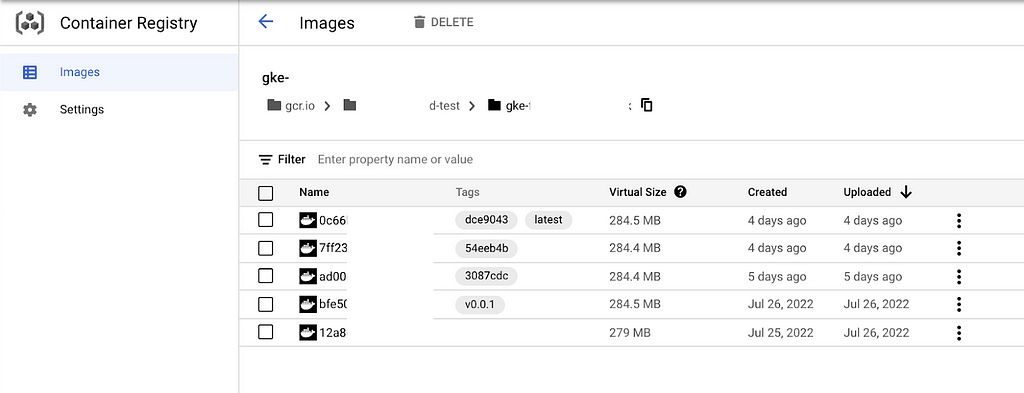
- Go into GCR and see the the image tagged with latest and commit id (SHORT_SHA)
- This was the Trigger build for development environment which automatically builds , tag, pushes, and deploy our image with (latest+short_sha) in GKE Cluster in a particular namespace.
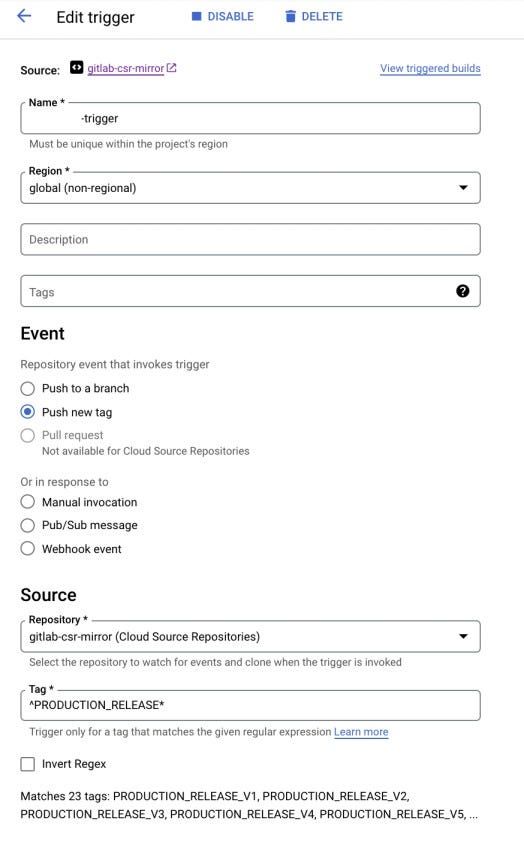
Creating triggers for production environments based on tag(Regex pattern).
- We can select tag events and filter it out to allow only (PRODUCTION_RELEASE_*) to get triggered.
- Event will be Push with a new tag
- Create a tag with following command and push the tag in the Gitlab repository
- git tag PRODUCTION_RELASE_2022_08_17
- git push origin PRODUCTION_RELASE_2022_08_17
Whenever we push the code with this prefix PRODUCTION_RELEASE*, only then our build will be triggered by cloud build Trigger, other prefixes or tags will be discarded.
For production environment we will push the events based o n git tags. For building and Pushing the image with Tag -> PRODUCTION_RELEASE* , we can see the tags values are automatically populated when we select our tags.
Tag based Trigger
This trigger invokes the cloudbuild to only build, tag and push the image to Google Container Registry.
Steps for deploying the image in GKE Cluster.
Here is the cloudbuild.yaml files describe the steps to builds the cached image, tag the image and push the image to GCR and deploy our image to GKE cluster in a particular namespace whenever we push our code into Gitlab repository.
Go to GCR an d see the tags for the image. we can see the following output.
The image is now tagged with SHORT_SHA, latest and PRODUCTION_RELEASE* tags.

Hence, we have set up the triggers for the development and production environment .and automatic deployments based on branch and tags.
Summary
In this blog, we overcome the limitations of webhook approach by introducing the mirroring apporach and learnt how we can use the features of Cloud Source Repositories to build our CI/CD pipelines for Staging and Production environments based on branch and tags.
References:
- https://cloud.google.com/architecture/mirroring-gitlab-repositories-to-cl oud-source-repositories
- https://cloud.google.com/build/docs/automating-builds/create-manage-triggers
Have Any Questions? : If you have any questions, I'll be happy to read them in the comments. Follow me on medium or LinkedIn.
Thank you , have a great day ahead 😊
Approach2- Mirroring CSR and Gitlab Repository to Create Cloud Build Triggers and automate the CICD… was originally published in Google Cloud - Community on Medium, where people are continuing the conversation by highlighting and responding to this story.
Comments
Post a Comment