Use the AWS Toolkit for Azure DevOps to automate your deployments to AWS
Many developers today seek to improve productivity by finding better ways to collaborate, enhance code quality and automate repetitive tasks. We hear from some of our customers that they would like to leverage services such as AWS CloudFormation, AWS CodeBuild and other AWS Developer Tools to manage their AWS resources while continuing to use their existing CI/CD pipelines which they are familiar with. These services range from popular open-source solutions, such as Jenkins, to paid commercial solutions, such as Azure DevOps Server (formerly Team Foundation Server (TFS) ).
In this post, I will walk you through an example to leverage the AWS Toolkit for Azure DevOps to deploy your Infrastructure as Code templates, i.e. AWS CloudFormation stacks, directly from your existing Azure DevOps build pipelines.
The AWS Toolkit for Azure DevOps is a free-to-use extension for hosted and on-premises Microsoft Azure DevOps that makes it easy to manage and deploy applications using AWS. It integrates with many AWS services, including Amazon S3, AWS CodeDeploy, AWS Lambda, AWS CloudFormation, Amazon SQS and others. It can also run commands using the AWS Tools for Windows PowerShell module as well as the AWS CLI.
Solution Overview
The solution described in this post consists of leveraging the AWS Toolkit for Azure DevOps to manage resources on AWS via Infrastructure as Code templates with AWS CloudFormation:

Figure 1. Solution high-level overview
Prerequisites and Assumptions
You will need to go through three main steps in order to set up your environment, which are summarized here and detailed in the toolkit’s user guide:
- Install the toolkit into your Azure DevOps account or choose Download to install it on an on-premises server (Figure 2).
- Create an IAM User and download its keys. Keep the principle of least privilege in mind when associating the policy to your user.
- Create a Service Connection for your project in Azure DevOps. Service connections are how the Azure DevOps tooling manages connecting and providing access to Azure resources. The AWS Toolkit also provides a user interface to configure the AWS credentials used by the service connection (Figure 3).
In addition to the above steps, you will need a sample AWS CloudFormation template to use for testing the deployment such as this sample template creating an EC2 instance. You can find more samples in the Sample Templates page or get started with authoring your own templates.
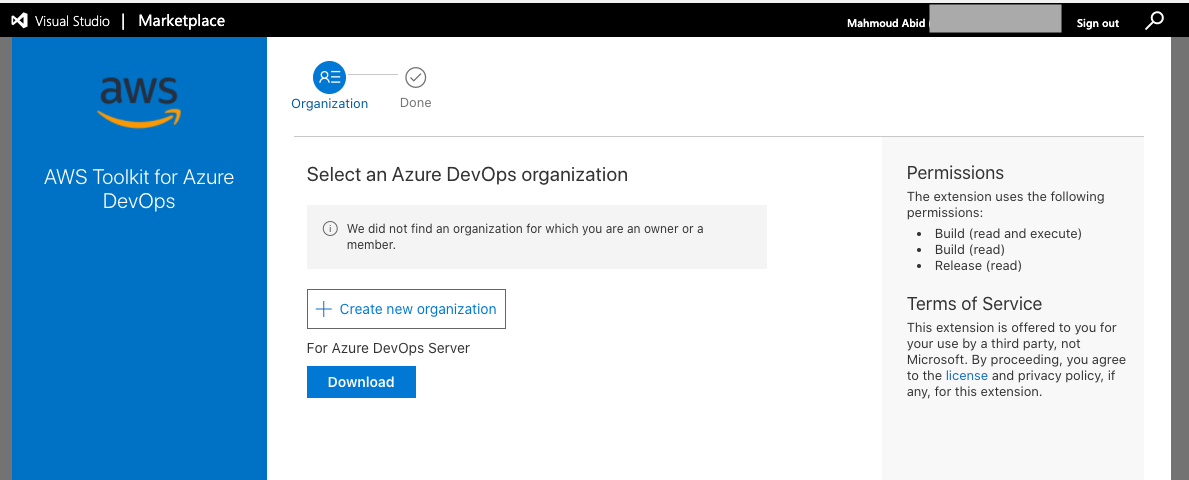
Figure 2. AWS Toolkit for Azure DevOps in the Visual Studio Marketplace
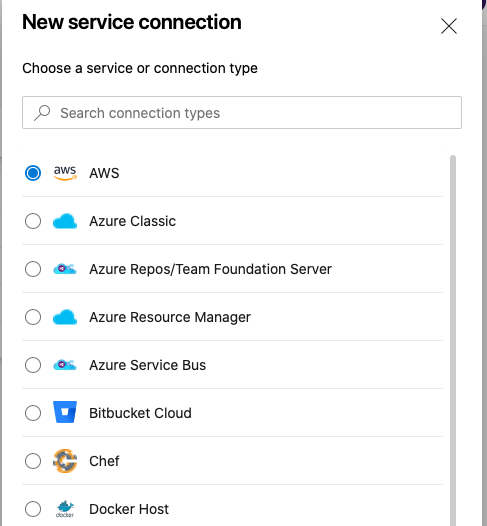
Figure 3. A new Service Connection of type “AWS†will appear after installing the extension
Model your CI/CD Pipeline to Automate Your Deployments on AWS
One common DevOps model is to have a CI/CD pipeline that deploys an application stack from one environment to another. This model typically includes a Development (or integration) account first, then Staging and finally a Production environment. Let me show you how to make some changes to the service connection configuration to apply this CI/CD model to an Azure DevOps pipeline.
We will create one service connection per AWS account we want to deploy resources to. Figure 4 illustrates the updated solution to showcase multiple AWS Accounts used within the same Azure DevOps pipeline.
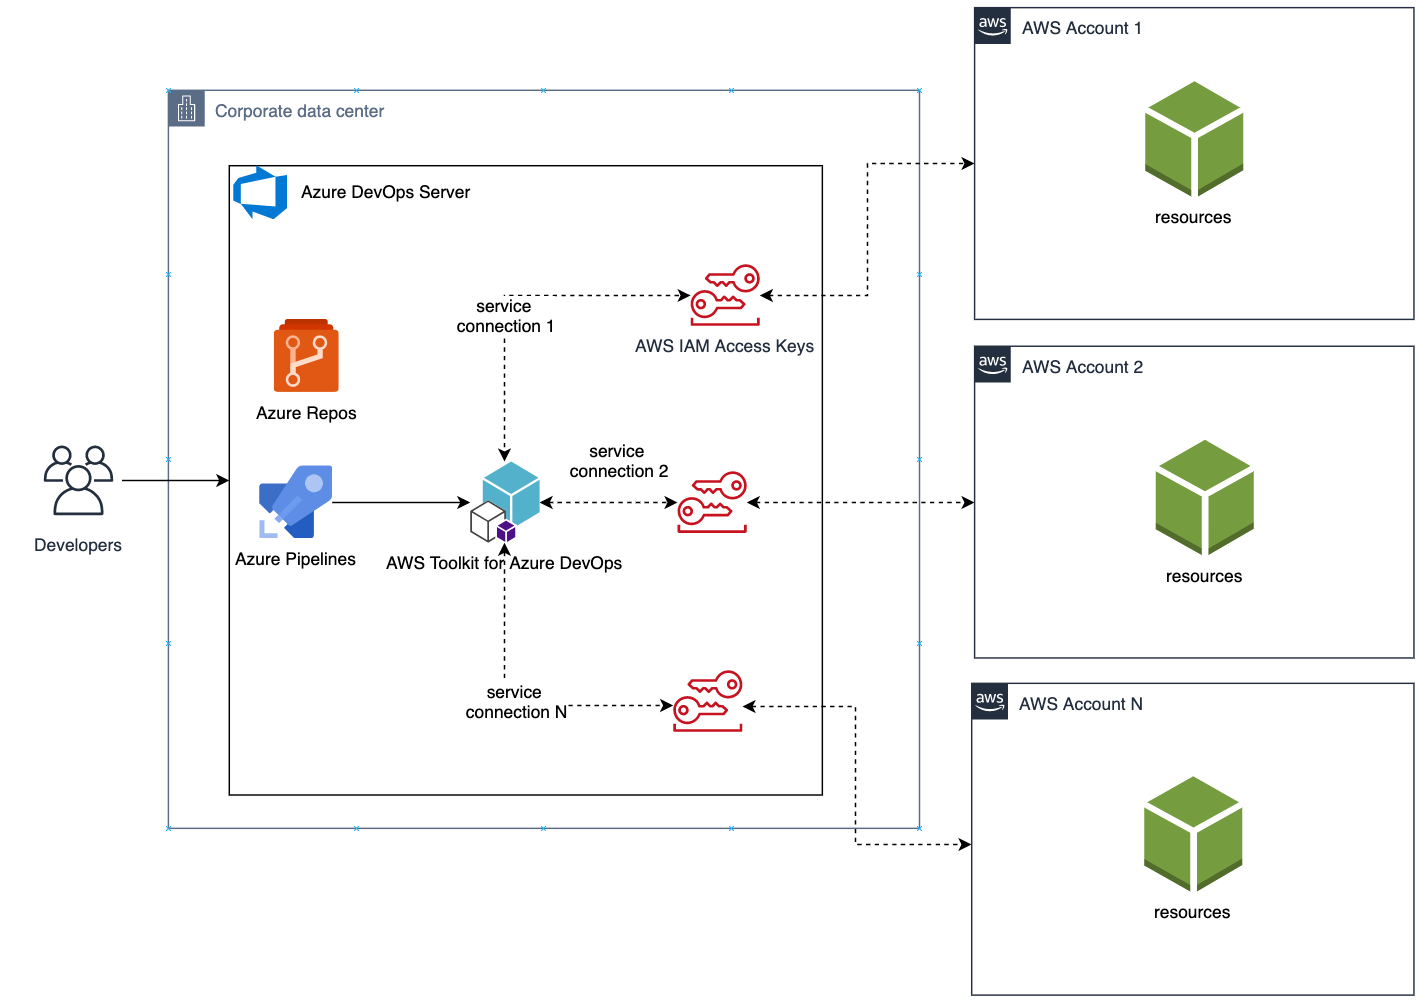
Figure 4. Solution overview with multiple target AWS accounts
Each service connection will be configured to use a single, target AWS account. This can be done in two ways:
- Create an IAM User for every AWS target account and supply the access key ID and secret access key for that user.
- Alternatively, create one central IAM User and have it assume an IAM Role for every AWS deployment target. The AWS Toolkit extension enables you to select an IAM Role to assume. This IAM Role can be in the same AWS account as the IAM User or in a different accounts as depicted in Figure 5.
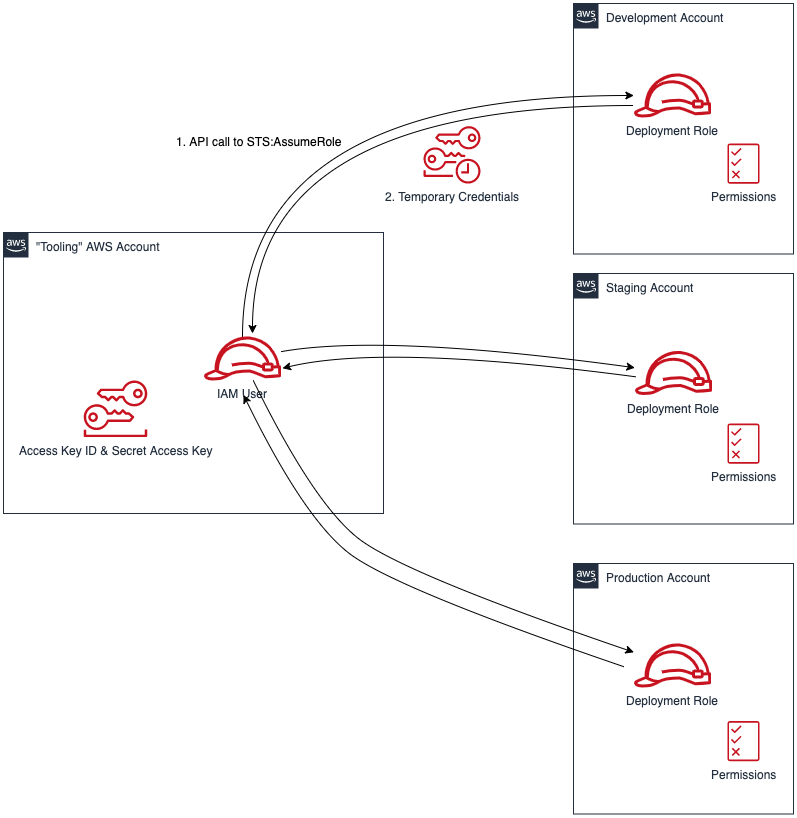
Figure 5. Use a single IAM User to access all other accounts
Define Your Pipeline Tasks
Once a service connection for your AWS Account is created, you can now add a task to your pipeline that references the service connection created in the previous step. In the example below, I use the CloudFormation Create/Update Stack task to deploy a CloudFormation stack using a template file named my-aws-cloudformation-template.yml:
- task: CloudFormationCreateOrUpdateStack@1 displayName: 'Create/Update Stack: Development-Deployment' inputs: awsCredentials: 'development-account' regionName: 'eu-central-1' stackName: 'my-stack-name' useChangeSet: true changeSetName: 'my-stack-name-change-set' templateFile: 'my-aws-cloudformation-template.yml' templateParametersFile: 'development/parameters.json' captureStackOutputs: asVariables captureAsSecuredVars: falseI used the service connection that I’ve called development-account and specified the other required information such as the templateFile path for the AWS CloudFormation template. I also specified the optional templateParametersFile path because I used template parameters in my template.
A template parameters file is particularly useful if you need to use custom values in your CloudFormation templates that are different for each stack. This is a common case when deploying the same application stack to different environments (Development, Staging, and Production).
The task below will to deploy the same template to a Staging environment:
- task: CloudFormationCreateOrUpdateStack@1 displayName: 'Create/Update Stack: Staging-Deployment' inputs: awsCredentials: 'staging-account' regionName: 'eu-central-1' stackName: 'my-stack-name' useChangeSet: true changeSetName: 'my-stack-name-changeset' templateFile: 'my-aws-cloudformation-template.yml' templateParametersFile: 'staging/parameters.json' captureStackOutputs: asVariables captureAsSecuredVars: falseThe differences between Development and Staging deployment tasks are the service connection name and template parameters file path used. Remember that each service connection points to a different AWS account and the corresponding parameter values are specific to the target environment.
Use Azure DevOps Parameters to Switch Between Your AWS Accounts
Azure DevOps lets you define reusable contents via pipeline templates and pass different variable values to them when defining the build tasks. You can leverage this functionality so that you easily replicate your deployment steps to your different environments.
In the pipeline template snippet below, I use three template parameters that are passed as input to my task definition:
# File pipeline-templates/my-application.yml parameters: deploymentEnvironment: '' # development, staging, production, etc awsCredentials: '' # service connection name region: '' # the AWS region steps: - task: CloudFormationCreateOrUpdateStack@1 displayName: 'Create/Update Stack: Staging-Deployment' inputs: awsCredentials: '${{ parameters.awsCredentials }}' regionName: '${{ parameters.region }}' stackName: 'my-stack-name' useChangeSet: true changeSetName: 'my-stack-name-changeset' templateFile: 'my-aws-cloudformation-template.yml' templateParametersFile: '${{ parameters.deploymentEnvironment }}/parameters.json' captureStackOutputs: asVariables captureAsSecuredVars: falseThis template can then be used when defining your pipeline with steps to deploy to the Development and Staging environments. The values passed to the parameters will control the target AWS Account the CloudFormation stack will be deployed to :
# File development/pipeline.yml container: amazon/aws-cli trigger: branches: include: - master steps: - template: ../pipeline-templates/my-application.yml parameters: deploymentEnvironment: 'development' awsCredentials: 'deployment-development' region: 'eu-central-1' - template: ../pipeline-templates/my-application.yml parameters: deploymentEnvironment: 'staging' awsCredentials: 'deployment-staging' region: 'eu-central-1'Putting it All Together
In the snippet examples below, I defined an Azure DevOps pipeline template that builds a Docker image, pushes it to Amazon ECR (using the ECR Push Task) , creates/updates a stack from an AWS CloudFormation template with a template parameter files, and finally runs a AWS CLI command to list all Load Balancers using the AWS CLI Task.
The template below can be reused across different AWS accounts by simply switching the value of the defined parameters as described in the previous section.
Define a template containing your AWS deployment steps:
# File pipeline-templates/my-application.yml parameters: deploymentEnvironment: '' # development, staging, production, etc awsCredentials: '' # service connection name region: '' # the AWS region steps: # Build a Docker image - task: Docker@1 displayName: 'Build docker image' inputs: dockerfile: 'Dockerfile' imageName: 'my-application:${{parameters.deploymentEnvironment}}' # Push Docker Image to Amazon ECR - task: ECRPushImage@1 displayName: 'Push image to ECR' inputs: awsCredentials: '${{ parameters.awsCredentials }}' regionName: '${{ parameters.region }}' sourceImageName: 'my-application' repositoryName: 'my-application' # Deploy AWS CloudFormation Stack - task: CloudFormationCreateOrUpdateStack@1 displayName: 'Create/Update Stack: My Application Deployment' inputs: awsCredentials: '${{ parameters.awsCredentials }}' regionName: '${{ parameters.region }}' stackName: 'my-application' useChangeSet: true changeSetName: 'my-application-changeset' templateFile: 'cfn-templates/my-application-template.yml' templateParametersFile: '${{ parameters.deploymentEnvironment }}/my-application-parameters.json' captureStackOutputs: asVariables captureAsSecuredVars: false # Use AWS CLI to perform commands, e.g. list Load Balancers - task: AWSShellScript@1 displayName: 'AWS CLI: List Elastic Load Balancers' inputs: awsCredentials: '${{ parameters.awsCredentials }}' regionName: '${{ parameters.region }}' scriptType: 'inline' inlineScript: 'aws elbv2 describe-load-balancers'Define a pipeline file for deploying to the Development account:
# File development/azure-pipelines.yml container: amazon/aws-cli variables: - name: deploymentEnvironment value: 'development' - name: awsCredentials value: 'deployment-development' - name: region value: 'eu-central-1' trigger: branches: include: - master - dev paths: include: - "${{ variables.deploymentEnvironment }}/*" steps: - template: ../pipeline-templates/my-application.yml parameters: deploymentEnvironment: ${{ variables.deploymentEnvironment }} awsCredentials: ${{ variables.awsCredentials }} region: ${{ variables.region }}(Optionally) Define a pipeline file for deploying to the Staging and Production accounts
# File staging/azure-pipelines.yml
container: amazon/aws-cli variables: - name: deploymentEnvironment value: 'staging' - name: awsCredentials value: 'deployment-staging' - name: region value: 'eu-central-1' trigger: branches: include: - master paths: include: - "${{ variables.deploymentEnvironment }}/*" steps: - template: ../pipeline-templates/my-application.yml parameters: deploymentEnvironment: ${{ variables.deploymentEnvironment }} awsCredentials: ${{ variables.awsCredentials }} region: ${{ variables.region }} # File production/azure-pipelines.yml container: amazon/aws-cli variables: - name: deploymentEnvironment value: 'production' - name: awsCredentials value: 'deployment-production' - name: region value: 'eu-central-1' trigger: branches: include: - master paths: include: - "${{ variables.deploymentEnvironment }}/*" steps: - template: ../pipeline-templates/my-application.yml parameters: deploymentEnvironment: ${{ variables.deploymentEnvironment }} awsCredentials: ${{ variables.awsCredentials }} region: ${{ variables.region }}Cleanup
After you have tested and verified your pipeline, you should remove any unused resources by deleting the CloudFormation stacks to avoid unintended account charges. You can delete the stack manually from the AWS Console or use your Azure DevOps pipeline by adding a CloudFormationDeleteStack task:
- task: CloudFormationDeleteStack@1 displayName: 'Delete Stack: My Application Deployment' inputs: awsCredentials: '${{ parameters.awsCredentials }}' regionName: '${{ parameters.region }}' stackName: 'my-application' Conclusion
In this post, I showed you how you can easily leverage the AWS Toolkit for AzureDevOps extension to deploy resources to your AWS account from Azure DevOps and Azure DevOps Server. The story does not end here. This extension integrates directly with others services as well, making it easy to build your pipelines around them:
- AWSCLI â€" Interact with the AWSCLI (Windows hosts only)
- AWS Powershell Module â€" Interact with AWS through powershell (Windows hosts only)
- Beanstalk â€" Deploy ElasticBeanstalk applications
- CodeDeploy â€" Deploy with CodeDeploy
- CloudFormation â€" Create/Delete/Update CloudFormation stacks
- ECR â€" Push an image to an ECR repository
- Lambda â€" Deploy from S3, .net core applications, or any other language that builds on Azure DevOps
- S3 â€" Upload/Download to/from S3 buckets
- Secrets Manager â€" Create and retrieve secrets
- SQS â€" Send SQS messages
- SNS â€" Send SNS messages
- Systems manager â€" Get/set parameters and run commands
The toolkit is an open-source project available in GitHub. We’d love to see your issues, feature requests, code reviews, pull requests, or any positive contribution coming up.
Author:
Comments
Post a Comment