Setting up a Lambda function to be triggered and send a message to SQS
Using Python & Boto3
Today we're going to be setting up a lambda function to be triggered and send a message to SQS.
In order to complete this task we will need the following:
- An AWS account with the necessary permissions
- Boto3 installed
- (I'll be using cloud 9 for this tutorial)
Step 1: The SQS queue
We're going to be creating our SQS queue with a python script in our cloud 9. https://boto3.amazonaws.com/v1/documentation/api/latest/guide/sqs.html This is the sample tutorial I borrowed the simple code from, it's just missing "import boto3".

Run this code to boot up your SQS queue. You'll see your SQS q ueue URL with the 5 second delay after running this code, (We'll need this later).
Step 2: The Lambda function
Head over to the Lambda dashboard in your AWS console and select "Create function". Keep "author from scratch" as your main option and select a runtime of python 3.7.
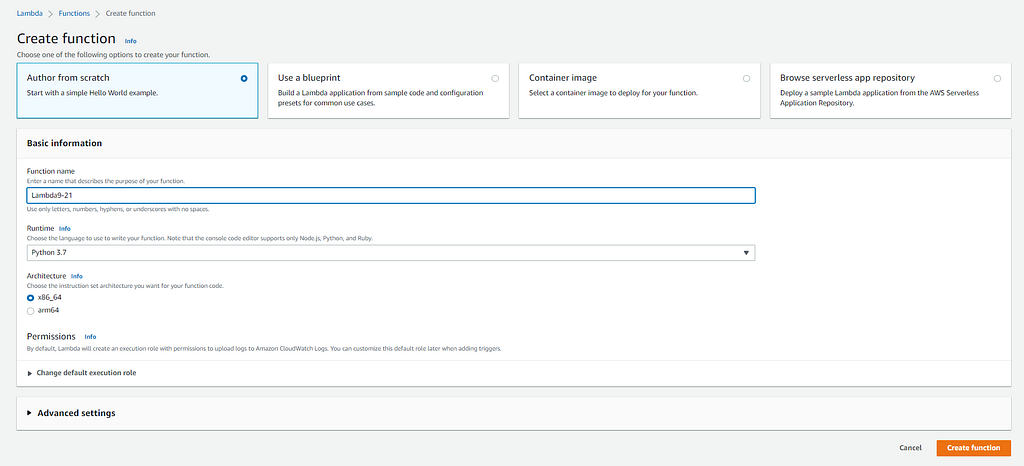
With these few settings configured, create your function.
Step 3: Adding the Lambda trigger
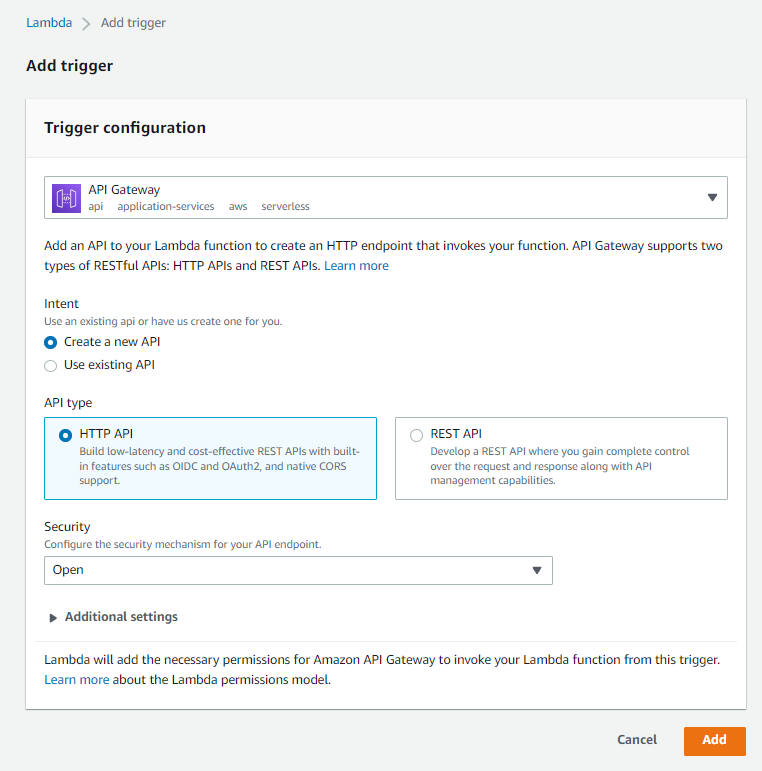
From the Lambda dashboard, we'll select "Add trigger" and select "API Gateway". Choose "Create a new API" and "HTTP API", with "Open" security. Then add the trigger.
Step 4: Permissions
Now we have to allow the right permissions, so we'll head to the "Configuration" tab and navigate to "Permissions". Select your role and click on the plus sign next to your role name.

On the right-hand side select "Edit" and "Add additional permissions". Select "SQS" as your service. For your access level select read and write. Now we'll select "Resources" and "Add ARN". We're going to add the ARN of our SQS queue, to find that you can head back to your SQS dashboard and select the one we've made for this project.

Then we'll go ahead and review or changes and save them.
Step 5: Lambda script
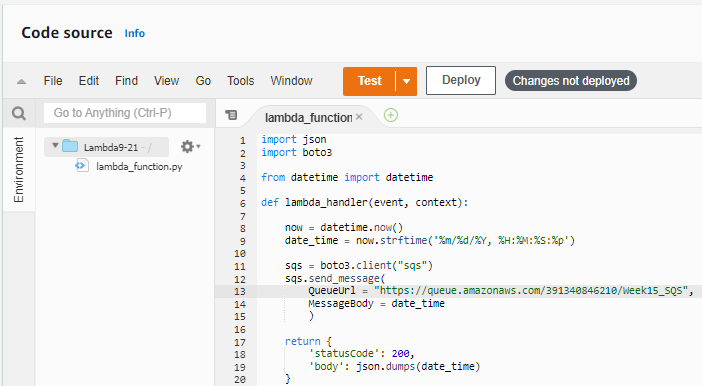
We'll make our way back to Lambda and enter a script that invokes a message to our SQS with the current date and time in your zone. The code looks like this:

You can get your SQS queue URL from your Cloud9 where we ran our code earlier.

Now your Lambda code should look similar to this:
Step 6: Testing
Time to see if we've done this correctly! Go ahead and hit "Deploy" to save your changes. Then we'll select "Test" to create a test. Give your test a name and keep your "Event sharing" as "Private". Under template select "apigateway-aws-proxy" and save!

Let's hit test, if done right you should get a status code of 200 like so:

Now let's go over to SQS to make sure we received the message. From the SQS dashboard, let's click on our function, and on the top right select "Send and receive messages". At the bottom of this page, we'll see "Poll for messages".

After clicking on "Poll for messages" we'll see a link/name:

And with everything working correctly you will see the current date and time!

I hope you've enjoyed following along with this article and even more so I hope it's been helpful!!
Have a blessed day.
Setting up a Lambda function to be triggered and send a message to SQS was originally published in Towards AWS on Medium, where people are continuing the conversation by highlighting and responding to this story.
Comments
Post a Comment